The wait is over. Let’s encrypt is now in public beta, meaning, you and I can get valid, trusted SSL certificates for our domains, FOR FREE, FOR LIFE TIME. I know, even I didn’t believe it the first time, but it’s true. It’s free. Free as in freedom.
In this article, I’ll show you guys how to set up an SSL certificate from Let’s encrypt for your domain. . Please note that you need a dedicated server/VPS for this. Shared hosting is not supported ( Obviously )
Update: If you are using cPanel, please checkout THIS
How to install & Setup Let’s encrypt on Centos 6.x and 7.x Link to heading
The thing about CentOs 6.x ( Centos 6.5, 6.6, 6.7 etc ) is it comes with Python 2.6 where as Let’s Encrypt supports Python 2.7+ only. But, installing Python 2.7 in Centos 6.x is pretty simple.
Installing Python 2.7 in Centos 6.x Link to heading
This step is only for Centos 6.x
# Install Epel Repository
yum install epel-release

# Install IUS Repository
rpm -ivh https://rhel6.iuscommunity.org/ius-release.rpm

# Install Python 2.7 and Git
yum --enablerepo=ius install git python27 python27-devel python27-pip python27-setuptools python27-virtualenv -y
Setting up Lets encrypt ( Below steps are common for Centos 6 and 7 ) Link to heading
# Install git
yum install git

# Install EPEL repo if not present
yum install epel-release

# Now let us clone the github repository of Let's encrypt
cd /root/
git clone https://github.com/letsencrypt/letsencrypt
This will now retrieve all the latest scripts from the repository to your server. You can find it under “/root/letsencrypt”
# cd to the letsencrypt directory
cd letsencrypt

# Run the auto installer
./letsencrypt-auto
This will take a few minutes. The script will install all the necessary modules. If your server has enough RAM, you shouldn’t face any issues with the installation. However, I received an error like below during the installation.
Command "/root/.local/share/letsencrypt/bin/python2.7 -c "import setuptools, tokenize;__file__='/tmp/pip-build-cAuqmP/cryptography/setup.py';exec(compile(getattr(tokenize, 'open', open)(__file__).read().replace('\r\n', '\n'), __file__, 'exec'))" install --record /tmp/pip-rhCaoe-record/install-record.txt --single-version-externally-managed --compile --install-headers /root/.local/share/letsencrypt/include/site/python2.7/cryptography" failed with error code 1 in /tmp/pip-build-cAuqmP/cryptography
That’s a nasty error. The reason behind the error is memory restrictions. I had to stop MySQL and Apache in my server for the installation to continue. This is why I said you shouldn’t do it on a production server. 😉
# Do the following only if you got an error like the above
# Stop mysql / mariadb
systemctl stop mariadb

# Stop Apache
systemctl stop httpd
The following is another common error you may face.
c/_cffi_backend.c:13:17: fatal error: ffi.h: No such file or directory
   #include <ffi.h>
                   ^
  compilation terminated.
This one can be fixed by installing some packages. Basically, it tells you that some of the required header files are not present yet.
sudo yum install gcc libffi-devel python-devel openssl-devel
Now, run the installer again.
# Run the auto installer
./letsencrypt-auto
This time the installer should succeed. At the time of writing, the letsencrypt auto installer did not do everything automatically on Centos 7. You will probably get the following notice if the installer couldn’t configure everything automatically.
If the above worked without any issue, the letsencrypt client will take care of the rest. You don’t have to do the steps below manually. Following is for manual setup
No installers are available on your OS yet; try running "letsencrypt-auto certonly" to get a cert you can install manually
This is 100% normal, and we can retrieve the certificate manually and it will work just fine.
Now, run the following command.
./letsencrypt-auto certonly
It will ask you to provide an email-id. Give a valid email ID you have access to. In case you lost the certificates, you can regain them using the email id. So, it is important to use a valid email ID
Now, it will show you the terms of service, accept it and press enter.
Next, it will ask you the domain name. This is the domain name we are installing the SSL certificate for. Give your domain name.
In my case, I will use “dev1.digitz.org” as the domain name. After that, you will get a message like below
Congratulations! Your certificate and chain have been saved at
   /etc/letsencrypt/live/<your-domain>/fullchain.pem. Your cert will
   expire on 2016-03-10. To obtain a new version of the certificate in
   the future, simply run Let's Encrypt again.
That’s it. You have retrieved the required SSL certificate and key for your domain. All we have to do is set it up in Apache.
The directories /etc/letsencrypt/archive and /etc/letsencrypt/keys contains all the certificates including the previous ones. And /etc/letsencrypt/live/<your-domain> contains symlinks to the latest certificates. For example, check the image below.
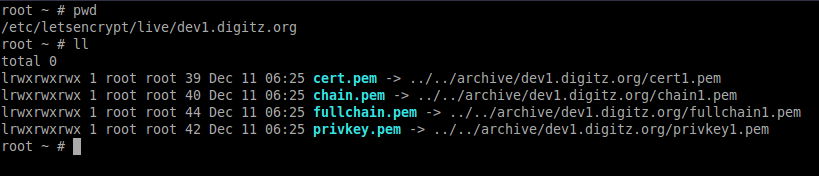
You can see that all the .pem files are actually symlinks. We will use the symlinks because every time we update the certificates, we don’t have to edit the configurations.
So, according to the letsencrypt documentation, the .pem files are as follows ( Copied from the Letsencrypt documentation without any shame 😉 ) Link to heading
privkey.pem : Link to heading
Private key for the certificate. This must be kept secret at all times! Never share it with anyone, including Let’s Encrypt developers. You cannot put it into a safe, however - your server still needs to access this file in order for SSL/TLS to work.
This is what Apache needs for SSLCertificateKeyFile,
cert.pem : Link to heading
Server certificate only. This is what Apache needs for SSLCertificateFile.
chain.pem : Link to heading
All certificates that need to be served by the browser excluding server certificate, i.e. root and intermediate certificates only.
This is what Apache needs for SSLCertificateChainFile.
fullchain.pem : Link to heading
All certificates, including server certificate. This is concatenation of chain.pem and cert.pem.
Set up the SSL certificates with Apache Link to heading
Now that we have the SSL certificate, we can install it with Apache. I guess you already have setup the Virtualhosts for your domain.
If you haven’t set up a virtualhost yet, don’t worry, I have made a post explaining how you can setup virtualhosts in Centos 7.
Read IT
I hope you have set up your VirtualHost properly. At this point, we have the VirtualHost entry and the certificates. Now we need to configure our VirtualHost to use SSL.
Also, You probably have to install the Apache SSL module, if not installed already.
yum install mod_ssl
Now, open up the virtualhost entry for your domain. For me, the file is “/etc/httpd/sites-enabled/dev1.digitz.org.conf”. Remember, if you followed the above tutorial to setup the VirtualHost, then you will have the HTTP ( port 80 ) entry already in the VirtualHost file
So, along with the “<VirtualHost *:80> entry add the following. ( Add it below the directive of the non SSL entry )
<VirtualHost *:443>
        ServerName dev1.digitz.org
        DocumentRoot /var/www/dev1.digitz.org/public_html
        ErrorLog /var/log/apache/dev1.digitz.org/error.log
        CustomLog /var/log/apache/dev1.digitz.org/access.log combined

		SSLEngine on
		SSLCertificateFile /etc/letsencrypt/live/dev1.digitz.org/cert.pem
		SSLCertificateKeyFile /etc/letsencrypt/live/dev1.digitz.org/privkey.pem
		SSLCertificateChainFile /etc/letsencrypt/live/dev1.digitz.org/chain.pem

</VirtualHost>
Now, replace all “dev1.digitz.org” with your domain name. If you’re too lazy, you can use the following command to replace it easily
sed -i 's|dev1.digitz.org|your-domain-.com|g' /path/to/your/virtualhost

# that is, if your domain is "example.com" and the VirtualHost configuration is located at
# "/etc/httpd/sites-enabled/example.com.conf" then the above command will become
sed -i 's|dev1.digitz.org|example.com|g' /etc/httpd/sites-enabled/example.com.conf
Finally, Restart apache
# Centos 7
systemctl restart httpd

# Centos 6
service httpd restart
Now, try visiting your domain “https://your-domain.com” and you should see the HTTPS version of the site. Now, does it show any warning? Nope! Check out the following image

If you face any issues in the process, let me know and I’ll try my best to rectify it 🙂 Have a good day.