This is a quick post about how to enable HTTP caching in Cloudflare for your Ghost powered blog.
Background Link to heading
Let me start by saying that this may not work for everyone, so please read this carefully before you set up caching by following this post.
My blog is primarily static. The only updates that happen are when I personally modify or add new content. I’ve set up Cloudflare in front of my Ghost blog to manage my traffic, and now I want to make the most of Cloudflare’s caching capabilities.
The goal? To prevent every request from hitting my Ghost server and instead, serve cached content from Cloudflare’s edge servers to visitors.
Step 1 : Enable Caching in Ghost Link to heading
As you are aware, Ghost is configured through a config file. For example, the production config file
is called config.production.json, you can read more about Ghost’s config options HERE
In your Ghost’s config file, you should find a section called caching. If this does not exist, you can simply add it.
We’re interested in two parts here: contentAPI and frontend.
- contentAPI deals with how long Ghost should cache the API responses.
- frontend controls how long the HTML from the site is cached.
So add an entry like this
"caching": {
    "contentAPI": {
        "maxAge": 60
    },
    "frontend": {
        "maxAge": 600
    }
}
This is my final config file look like (with some redactions of course)
{
    "url": "https://example.com",
    "database": {
    --snip--
    },
    "caching": {
        "contentAPI": {
                "maxAge": 60
        },
        "frontend": {
                "maxAge": 600
        }
    }
}
In this case, the API will be cached for 60 seconds and all the other pages will be cached for 600 seconds (10 minutes), set values to your preference
Step 2: Set Up Cloudflare (if not already done) Link to heading
I am assuming that your blog is already setup with Cloudflare, if not, you can follow their docs and add your site to Cloudflare.
Edge Cache vs Browser Cache: What’s the Difference? Link to heading
Before we dive further, let’s take a brief moment to understand the difference between edge caching and browser caching.
Browser Cache: When a user visits a website, the browser downloads and stores certain files from the site (like images, CSS, and JavaScript files) locally on the user’s device. This is known as browser caching. The next time the user visits the same site, the browser can load these files from its local cache, instead of downloading them again from the server. This makes the website load faster for the user.
Edge Cache: Edge caching is a bit different. In this case, the content of the website is stored on various servers spread across the globe, known as edge servers. When a user requests a webpage, the content is delivered from the nearest edge server, instead of the original server. This reduces the load on the original server and can significantly speed up the delivery of the content, especially for users who are far away from the original server.
In our case, we’re using Cloudflare, which has a large network of edge servers. By storing our blog content on these edge servers (i.e., implementing edge caching), we can reduce the load on our Ghost server and deliver content faster to our readers, no matter where they are in the world.
Step 3 : Setup caching rule Link to heading
In your Cloudflare dashboard, go to the Page Rules section. Here, create a new rule that says URL path starts with /. This means that the rule will apply to all the pages on your blog.
Then, in the settings, select ‘Override Cache Control’ and set the Edge Cache TTL to ‘2 hours’. This tells Cloudflare to cache your content for two hours, regardless of what your server’s cache headers might be saying.
Please refer to the image
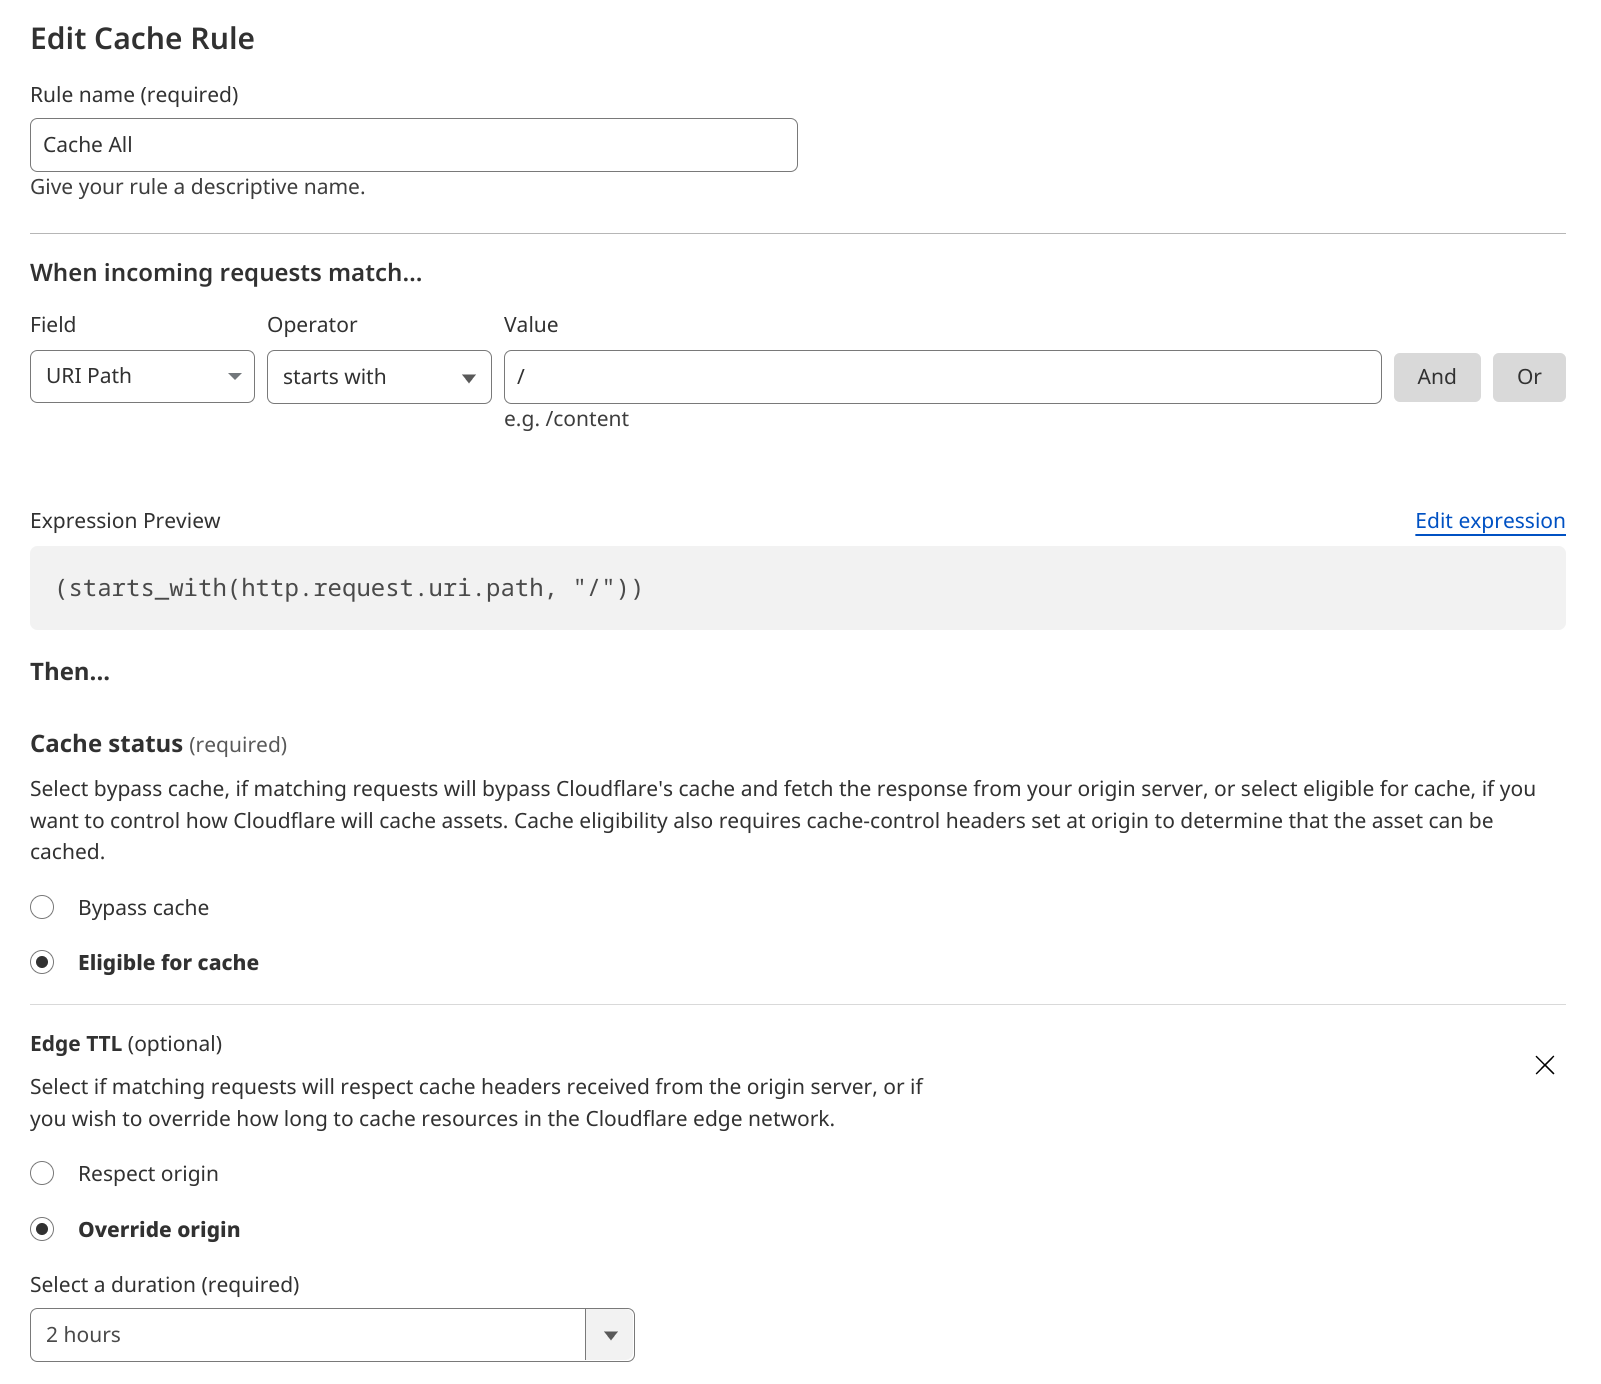
So, now you can see that there are two sections you can configure, Edge TTL and Browser TTL. If you don’t understand
the difference, please read the previous section in this blog post.
So, set an appropriate value for both.
Note: You can always easily remove the cache from Cloudflare, but you cannot remove cached content from a user’s browser. So beware of this before choosing what TTL for caching
Once you have configured proper TTL, click Deploy, this will activate the caching rule
Step 4 : Verify caching Link to heading
Using the command line - curl Link to heading
If you are familiar with the command line and if you have curl installed, you can check if your blog is getting
cached by using the following command
➜  ~ curl -vso /dev/null https://your web site address/ 2>&1 | grep -i age:
< age: 2859
If the age says anything above 0, then it is getting cached. If it says 0, run that command a several times
so that Cloudflare caches it.
Using browser Developer tools Link to heading
If you’re not comfortable using curl or other command line tools, don’t worry! You can verify your caching setup using Google Chrome’s Developer Tools as well. Here’s how to do it:
Open Google Chrome and navigate to your blog.
Right-click anywhere on the page and select ‘Inspect’ or simply press Ctrl + Shift + I on your keyboard. This will open Chrome’s Developer Tools.
Go to the ‘Network’ tab in the Developer Tools window.
Now, refresh your blog page. As the page reloads, you’ll see a lot of requests showing up in the Network tab.
Click on the name of the first request, which should be the URL of your blog. This will open up a side panel with more details about the request.
In this side panel, scroll down to the ‘Response Headers’ section. Here, you can see all the HTTP headers that your server and Cloudflare are sending with your blog’s content.
Look for the Cache-Control and Age headers. The Cache-Control header should indicate the max-age that you’ve set in your Cloudflare rule, and the Age header should tell you how long the response has been cached at Cloudflare.
Refer to the image below
